kevin o'connor detuned speaker cab

Discussion of Speakers, Cabinets and Cabinet Building

Moderators: pompeiisneaks, Colossal

shoggoth
Posts: 165
Joined: Fri Apr 06, 2012 2:56 am

kevin o'connor detuned speaker cab

Post by shoggoth »

I got my speaker cabinet glued up today. It's a Kevin O'Connor style detuned 2x12 cabinet (it has two extra rectangular openings approximating the size of two extra speaker holes in area, and it's 16" deep). Supposedly they sound awesome, we shall see!

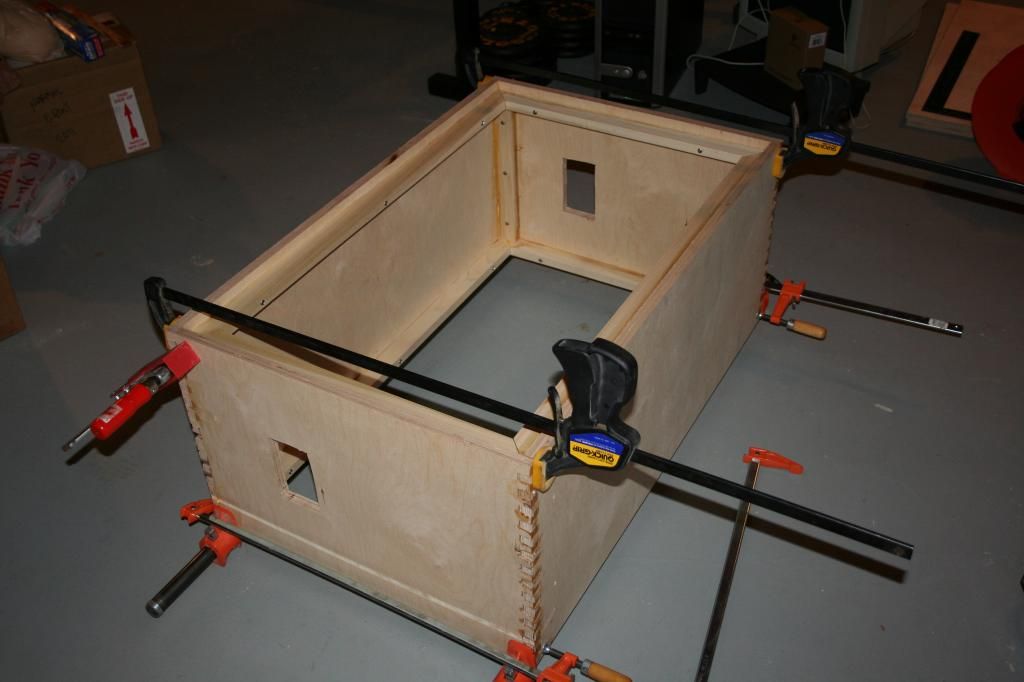
I used finger joints, which stink in plywood, and my jig kept slipping (the epic story is detailed here http://ampgarage.com/forum/viewtopic.php?t=25605). So some of the finger joints are all screwy and need to be filled. I glued & screwed a some braces inside to add extra glue surface for strength to make up for the weaker finger joints.

I did all the glue-up with Titebond wood glue instead of epoxy, just easier to deal with. I'll still fill the ruined finger joints and other surface imperfections with wood-flour-thickened epoxy though, that'll adhere way better than any wood filler I can think of.

Questions I have:

a. I will be rear-mounting the speakers to the baffle. I messed up and did a 3/4" setback instead of 1", so the 11/16" plywood will be nearly flush with the cabinet, or probably exactly flush with the thickness of the grill cloth added in. Is that a big deal? Should I find some 1/2" plywood for the baffle? Mostly a cosmetic issue, I imagine.

b. Would piping look good with a flush surface like that? Guessing probably not

c. What's the preferred method for attaching the speakers? Screwing directly into the plywood, or using those T nuts ? If T nuts, should I use a Forstner bit so the nut is recessed flush into the plywood?

d. Any ideas on how to cut a perfectly square hole? My hand-cutting with the jig saw for the handle cutouts was less than impressive

Anyhow, picture below:

[img:1024:682]http://i234.photobucket.com/albums/ee25 ... c098a4.jpg[/img]
User avatar
Phil_S
Posts: 5946
Joined: Tue Oct 23, 2007 10:12 pm
Location: Baltimore, MD

Re: kevin o'connor detuned speaker cab

Post by Phil_S »

shoggoth wrote:I used finger joints....I glued & screwed a some braces inside to add extra glue surface for strength to make up for the weaker finger joints.
Apologies for this comment...use rabbets next time if you are going to put braces on the inside. Anyway, it looks plenty strong.
a... Should I find some 1/2" plywood for the baffle?
I would. Not sure what others might think. 1/2" is plenty strong.
b. Would piping look good with a flush surface like that? Guessing probably not
There is no accounting for the taste of others ;-}
c. What's the preferred method for attaching the speakers? Screwing directly into the plywood, or using those T nuts?
T-nuts are the way to go.
If T nuts, should I use a Forstner bit so the nut is recessed flush into the plywood?
I wouldn't bother. Install the T-nuts and paint the baffle and the T-nuts black.
d. Any ideas on how to cut a perfectly square hole? My hand-cutting with the jig saw for the handle cutouts was less than impressive
Build a square frame from scrap and use that as the router guide. Use a flush cut bit with a bearing that rides the guide. Or just clamp a straight edge and be very, very careful to stop before you get to the corners. Finish with a chisel. (I'm hoping you have a router!)

If no router, on plywood you may be able to do it with a metal straight edge and a razor knife. It will take patience and it will be time consuming. You can probably remove one layer at a time. It will be easier if you remove the middle with the jig saw first. Define the corners with a small size drill bit.
User avatar
TUBEDUDE
Posts: 1666
Joined: Thu Jan 04, 2007 5:23 pm
Location: Mastersville

Re: kevin o'connor detuned speaker cab

Post by TUBEDUDE »

I built a Cajon with plywood using the router/chisel method. I used that expanding urethane glue to fill any voids and it worked like a champ.
Attachments
1408400948603.jpg
Tube junkie that aspires to become a tri-state bidirectional buss driver.
User avatar
TUBEDUDE
Posts: 1666
Joined: Thu Jan 04, 2007 5:23 pm
Location: Mastersville

Re: kevin o'connor detuned speaker cab

Post by TUBEDUDE »

Wow, that pic looks terrible in the harsh flash. It looks good live. Nice and smooth and strong beyond belief.
Tube junkie that aspires to become a tri-state bidirectional buss driver.
Geeze
Posts: 379
Joined: Fri Jul 12, 2013 3:41 am

Re: kevin o'connor detuned speaker cab

Post by Geeze »

Welcome to the fine art of cabinet making - perfection is an illusion, fixing the F'ups is the reality. I miss-measured a head cab height and the power tubes are 1/8" from the top. Now it has two 2" holes and artful wood grill inserts to make it look intentional. My acoustic guitar building buddy says if I stop pointing out the flaws - no one will see them.

I prefer 1/2" for baffles up to 4x10 [biggest so far]. I like to drill in #8 machine screws and epoxy them in place. Without a good jig square holes can be a challenge of cutting close with a jig saw and file and sand until you say good. Your 'good' is probably a slower process than mine as I am impatient. I would not bother with square holes as a round hole is much easier.

For filling in the voids I epoxy in slivers of wood and fill in the really small gaps with epoxy and finish with CA and accelerant. Sometimes accelerant first then CA - did I mention impatience?

Please report on your impressions of the sound.

Russ
Attachments
10x8x8 (2).JPG
User avatar
TUBEDUDE
Posts: 1666
Joined: Thu Jan 04, 2007 5:23 pm
Location: Mastersville

Re: kevin o'connor detuned speaker cab

Post by TUBEDUDE »

Nice quilt.
Tube junkie that aspires to become a tri-state bidirectional buss driver.
shoggoth
Posts: 165
Joined: Fri Apr 06, 2012 2:56 am

Re: kevin o'connor detuned speaker cab

Post by shoggoth »

I'm building more jigs than cabinets here... used the miter saw & corner clamps to put together a frame, so that I can use it to guide the router. My finger joint bit has one of those rolly-wheel thingies so it can do double duty for cutting the holes in the baffle.

Also putting together a rotating jig to screw the router to, so I can do the speaker holes - I had an adjustable 12" hole saw, it just jams up violently and frighteningly on plywood, so I won't be using that anymore.

Hope to do the baffle and fill in the finger joint errors tomorrow, we'll see how far I really get...
User avatar
Phil_S
Posts: 5946
Joined: Tue Oct 23, 2007 10:12 pm
Location: Baltimore, MD

Re: kevin o'connor detuned speaker cab

Post by Phil_S »

shoggoth wrote: rolly-wheel thingies
a/k/a bearing, very handy for riding the jig. I hope it works well for you.
shoggoth
Posts: 165
Joined: Fri Apr 06, 2012 2:56 am

Re: kevin o'connor detuned speaker cab

Post by shoggoth »

Got the speaker holes cut out. Almost perfect, except a nub sticking out where the router went all the way around and finished the circle. Stupid geometry.

How do you guys get rid of it? With a file? Power tools? Fire?

[edit - googled, see that people don't cut all the way through in the first pass. so less to clean up at the end. well, that's not how I did it, so I guess I get to do hand filing...]
Geeze
Posts: 379
Joined: Fri Jul 12, 2013 3:41 am

Re: kevin o'connor detuned speaker cab

Post by Geeze »

Sand, sand, sand away, gently 'til you scream. Back away to save the day and don't touch the gasoline. [Sorry, 5AM waiting on coffee]

Files or sanding. I cut mine with a saber saw and use an oscillating 2" drum sander to true it up.

Russ
User avatar
Phil_S
Posts: 5946
Joined: Tue Oct 23, 2007 10:12 pm
Location: Baltimore, MD

Re: kevin o'connor detuned speaker cab

Post by Phil_S »

Dremel with the tiny drum sander. It helps to have the Dremel jig that keeps it square to the workpiece. I don't know what that call that thing, but it is a bell shaped thing for use with a router bit. It goes without saying, you've got to take it slow. Remember, once removed, you can't put it back.

Next time you do this, modify your technique. Using the router with a circle cutting jig, don't remove material all the way through. Let's say the wood is .75". Remove the full circle depth about 7/8 of the way around, but only 1/2" depth of cut for the rest. Then use a flush cutter to finish the last 1/4" depth. If the bearing is at the top of the bit, you don't need to flip the work piece over, but you do need to create space below it. If the bearing is at the bottom of the bit (typical flush cut) flip the work over and remove the rest of the circle. This may leave a mark or a line where you took 2 passes to make the full cut. A bit of hand sanding makes quick work of that. The appearance of the circle on the top and bottom should be 99.9% perfect. If you are really good at it and have good tools, you can do 100%.

I prefer bearing at the top of the bit. With bearing at the bottom of the bit, you have to work blind. Bearing on the top allows you to see the cut as it is being done. If you have a good router and sharp bit, it really shouldn't matter. If you have a cheap router (like the one I just retired), beware of bit siippage and that's reason I like to see what's being cut.
shoggoth
Posts: 165
Joined: Fri Apr 06, 2012 2:56 am

Re: kevin o'connor detuned speaker cab

Post by shoggoth »

I filed the nub off by hand, got it all cleaned up within 5 minutes, so no worries.

So more questions about finishing & attaching speakers

a. Do you prime before spraypainting interior black ? Guessing not, everything is beneath grill cloth so perfect finish doesn't really matter ?

b. Do you use 1/8 roundover bits and routers on speaker holes, edges of baffles, interior edges of cab, or just hand sand to round them off a little?

c. I have a pair of celestion speakers, the foam overlaps the screw holes in the speaker frame - do you cut that out with an exacto knife or just jam the screw through the hole and crush/push the foam out of the way ?

d. How far do you tighten the frame down against the foam when you mount the speaker?

Thanks in advance!
Geeze
Posts: 379
Joined: Fri Jul 12, 2013 3:41 am

Re: kevin o'connor detuned speaker cab

Post by Geeze »

Just paint it black. I run a bit of 100 grit around to 'break' the edges, nothing fancy. I use #8 washers/lock washers/nuts. I tighten just to compress the lock washer. Less is more with torque - bent speaker baskets are not fixable.

Russ
shoggoth
Posts: 165
Joined: Fri Apr 06, 2012 2:56 am

Re: kevin o'connor detuned speaker cab

Post by shoggoth »

2 steps forward, 1 step back.

So I built a jig to cut out the square holes for the detuned ports - basically a picture frame. Then went to run the router along the edge, with a bit with a beraing, and it just kept kicking all over the place. Pretty dangerous and the edges have all kinds of divets now where it kicks, so I stopped.

I'm thinking it's because I'm cutting through plywood without anything holding the router in place, so it just wants to wander wherever.

Maybe if I cut out a slightly smaller square with a jigsaw and clean up the edges using the jig & router, if it only had to cut away 1/8" or something? Would that kick so much?

The circular holes were much easier, it was all bolted into place and couldn't kick.
User avatar
TUBEDUDE
Posts: 1666
Joined: Thu Jan 04, 2007 5:23 pm
Location: Mastersville

Re: kevin o'connor detuned speaker cab

Post by TUBEDUDE »

I've had better luck using the spiral bit instead of the standard router bit with plywood.
Tube junkie that aspires to become a tri-state bidirectional buss driver.
Post Reply