Original Circuit schematic and layout... for roasting

General discussion area for tube amps.

Moderators: pompeiisneaks, Colossal

Post Reply
steelwitch
Posts: 16
Joined: Thu Nov 28, 2019 5:51 am

Original Circuit schematic and layout... for roasting

Post by steelwitch »

Hello!

Here's a circuit design that's kind of a cross between a british preamp and an american style tweed poweramp and PI with a gibson inspired reverb circuit using a 12dw7 to eliminate the parallel reverb driver.

What do you think? I have gotten some useful feedback on the schematic already, but putting this out there on the amp garage for you to check out.

I kind of lifted the layout style from Carr amps.. but not sure if I totally captured how cool it is. The thing I like about this layout is it makes Merlin's galactic grounding scheme very easy and should be very quiet. Should be better in 3D (hopefully) :mrgreen: There are a few wire runs that are longer than I would like, but I think for the sake of lead dress it's worth it. Thanks!
You do not have the required permissions to view the files attached to this post.
steelwitch
Posts: 16
Joined: Thu Nov 28, 2019 5:51 am

Re: Original Circuit schematic and layout... for roasting

Post by steelwitch »

i would love some direction on the layout specifically. Maybe I’d be better going a different direction with it
frankdrebin
Posts: 131
Joined: Wed May 14, 2014 11:40 am

Re: Original Circuit schematic and layout... for roasting

Post by frankdrebin »

its not bad,maybe the power tubes grid wires could be more direct,in general i find a bit odd making a point to point with 2 tag strips and there's nothing in between them except the 3 filter caps,i don't know if that's due to chassis dimensions,given the chance i would keep the preamp tubes closer to the controls.
pdf64
Posts: 2719
Joined: Sat Mar 12, 2011 9:23 pm
Location: Staffordshire, UK

Re: Original Circuit schematic and layout... for roasting

Post by pdf64 »

The schematic labelling for the tubes seems wonky, lottsa V1s.
The treble cap is 10x higher value than is typical of the usual Gibson/Vox type tone stack, correct?
The unusually high value of the reverb intensity pot may cause the dry signal level to increase (~3dB) as it is advanced.
It’s good practice to add series protection silicon diodes for each rectifier plate, and a HT fuse; with diodes fitted, the fuse could be inserted in the CT’s 0V return. As there’s no standby, it can be fast blow, and so even more beneficial.
Agree about the strange wire run to the power tube grids.
steelwitch
Posts: 16
Joined: Thu Nov 28, 2019 5:51 am

Re: Original Circuit schematic and layout... for roasting

Post by steelwitch »

E164DC90-C06E-480B-8B8B-497DED7FCCEC.png
pdf64 wrote: Sat Nov 30, 2019 6:02 pm The schematic labelling for the tubes seems wonky, lottsa V1s.
The treble cap is 10x higher value than is typical of the usual Gibson/Vox type tone stack, correct?
The unusually high value of the reverb intensity pot may cause the dry signal level to increase (~3dB) as it is advanced.
It’s good practice to add series protection silicon diodes for each rectifier plate, and a HT fuse; with diodes fitted, the fuse could be inserted in the CT’s 0V return. As there’s no standby, it can be fast blow, and so even more beneficial.
Agree about the strange wire run to the power tube grids.
Thanks for the input pdf64— I copied the Hoffman ac30 tonestack for reference. It is filtering higher frequencies than most vox tonestacks I’ve seen. What is your suggested value? I built a Hoffman ac30 a few months ago and very much liked the tonestack, but down to try other things!

I do like that suggestion for the rectifier tube. Is this an amp that would benefit from a standby switch? I felt like the voltage was low enough to avoid cathode stripping of any kind. Plus the chassis I’m building it into has barely enough room for a 3 position carling switch or else I totally would have put a standby in there!

I ended up revising the layout in a big way— here’s where it’s at. It’s sort of a board layout built onto terminal strips and flying certain components to ground when convenient. I think it’s a much better approach. Thanks for taking a look!
You do not have the required permissions to view the files attached to this post.
steelwitch
Posts: 16
Joined: Thu Nov 28, 2019 5:51 am

Re: Original Circuit schematic and layout... for roasting

Post by steelwitch »

And yes, there are some inconsistencies with the schematic— I’m kinda new to expressSCH and was working off components that were not editable :oops:
gingertube
Posts: 530
Joined: Mon Nov 14, 2011 2:29 am
Location: Adelaide, South Oz

Re: Original Circuit schematic and layout... for roasting

Post by gingertube »

Too many gain stages on the power supply D node. That is inviting motorboating form of oscillation, particularly as bypass caps get older.

You need at least one more, possibly two(2) B+ nodes.

Also, the grid stops (1K5) are too low for 6V6 (that value is for high gm tubes like EL34 an EL84).
Concertina splitters react badly to unbalanced loads on anode and cathode which will occur when overdriving the output tubes. That can be fixed by increasing the output tube grid stops.
So while the output tube grid stops need to be increased from 1K5 to at least 10K I would recommend pushing them way up to say 39K or 47K to improve the phase splitter performance when overdriving the 6V6s.

Cheers,
Ian
steelwitch
Posts: 16
Joined: Thu Nov 28, 2019 5:51 am

Re: Original Circuit schematic and layout... for roasting

Post by steelwitch »

gingertube wrote: Mon Dec 02, 2019 2:28 am Too many gain stages on the power supply D node.
Oh! I actually didn't notice there's a typo about that in my schematic. The input stage is coming from node "E" NOT "D". I know the general rule is 2 gain stages per node but does that apply to cathode followers? Not sure if it's more demanding than a typical triode gain stage.
gingertube wrote: Mon Dec 02, 2019 2:28 amAlso, the grid stops (1K5) are too low for 6V6 (that value is for high gm tubes like EL34 an EL84).
Concertina splitters react badly to unbalanced loads on anode and cathode which will occur when overdriving the output tubes. That can be fixed by increasing the output tube grid stops.
So while the output tube grid stops need to be increased from 1K5 to at least 10K I would recommend pushing them way up to say 39K or 47K to improve the phase splitter performance when overdriving the 6V6s.
I've seen some designs use 47k.. some old supro's have them. Is it worth experimenting to see what kind of characteristics it changes to the overdrive tone? or would screen resistors have more of an effect over this? I've only ever seen 1.5k in fenders, 5.6k in marshalls and 47k in supros etc.
DimenBrun
Posts: 19
Joined: Wed Jul 03, 2019 4:06 am

Re: Original Circuit schematic and layout... for roasting

Post by DimenBrun »

I think Gingertube's advice is good regarding the chance for low freq oscill. I had a deluxe rev that I had modded to an MB mark 1(sort of) by adding a gain stage on the front end. I ran all 4 preamp stages(2 pre tonestack, one post tonestack, one post rev 3.3meg resistor) off one PS node, but I was using ~80uf (as I recall) for that PS node. It worked fine when the PS cap was new but started having issues after a few years. I eventually went with 2 PS nodes to fix this.
User avatar
Colossal
Posts: 5059
Joined: Sat Oct 20, 2007 9:04 pm
Location: Moving through Kashmir

Re: Original Circuit schematic and layout... for roasting

Post by Colossal »

Fender is famous for operating four gain stages off one cap. Friends don't let friends keep propagating bad amp design.
sluckey
Posts: 3113
Joined: Sun Jul 22, 2007 7:48 pm
Location: Mobile, AL
Contact:

Re: Original Circuit schematic and layout... for roasting

Post by sluckey »

They operate 6 stages in the very successful AB763 reverb models! Not recommending doing so or even saying it's a good idea, just sayin'...
steelwitch
Posts: 16
Joined: Thu Nov 28, 2019 5:51 am

Re: Original Circuit schematic and layout... for roasting

Post by steelwitch »

I do have a JJ 40/20/20/20 can cap laying around which would give me some room to add an extra PS node and possibly get away with a 3 lug terminal strip for the 2 extras. It will probably be worth my while to make sure the PSU is able to handle its demands for eternity, or at least until the caps dry out and get old! It will fit into the Princeton chassis I’m using too, but I don’t love the idea of one ground for all of those nodes. It will save me lots of space though! Using the last two nodes on a separate board will allow me to ground them to the signal ground bus as well. Thanks for your input these are all great things to consider!
steelwitch
Posts: 16
Joined: Thu Nov 28, 2019 5:51 am

Re: Original Circuit schematic and layout... for roasting

Post by steelwitch »

The more I’m thinking about this construction style, I’m leaning towards going with 2 turret strips with the correct amount of turrets on them. I’ve seen that kind of thing in some of the handwired tone king amps and it seems like very reliable build quality. Plus it forgoes a lot of mounting points for 5 lug terminal strips and turns them into 2 on each end of the strip
pdf64
Posts: 2719
Joined: Sat Mar 12, 2011 9:23 pm
Location: Staffordshire, UK

Re: Original Circuit schematic and layout... for roasting

Post by pdf64 »

steelwitch wrote: Mon Dec 02, 2019 12:20 am...Is this an amp that would benefit from a standby switch? I felt like the voltage was low enough to avoid cathode stripping of any kind...
I'm not aware of any credible sources that raise cathode stripping as a potential issue for the tube types / application relevant to tube guitar amps. So best to regard the whole thing as being common misapprehension amongst the tube guitar amp world.
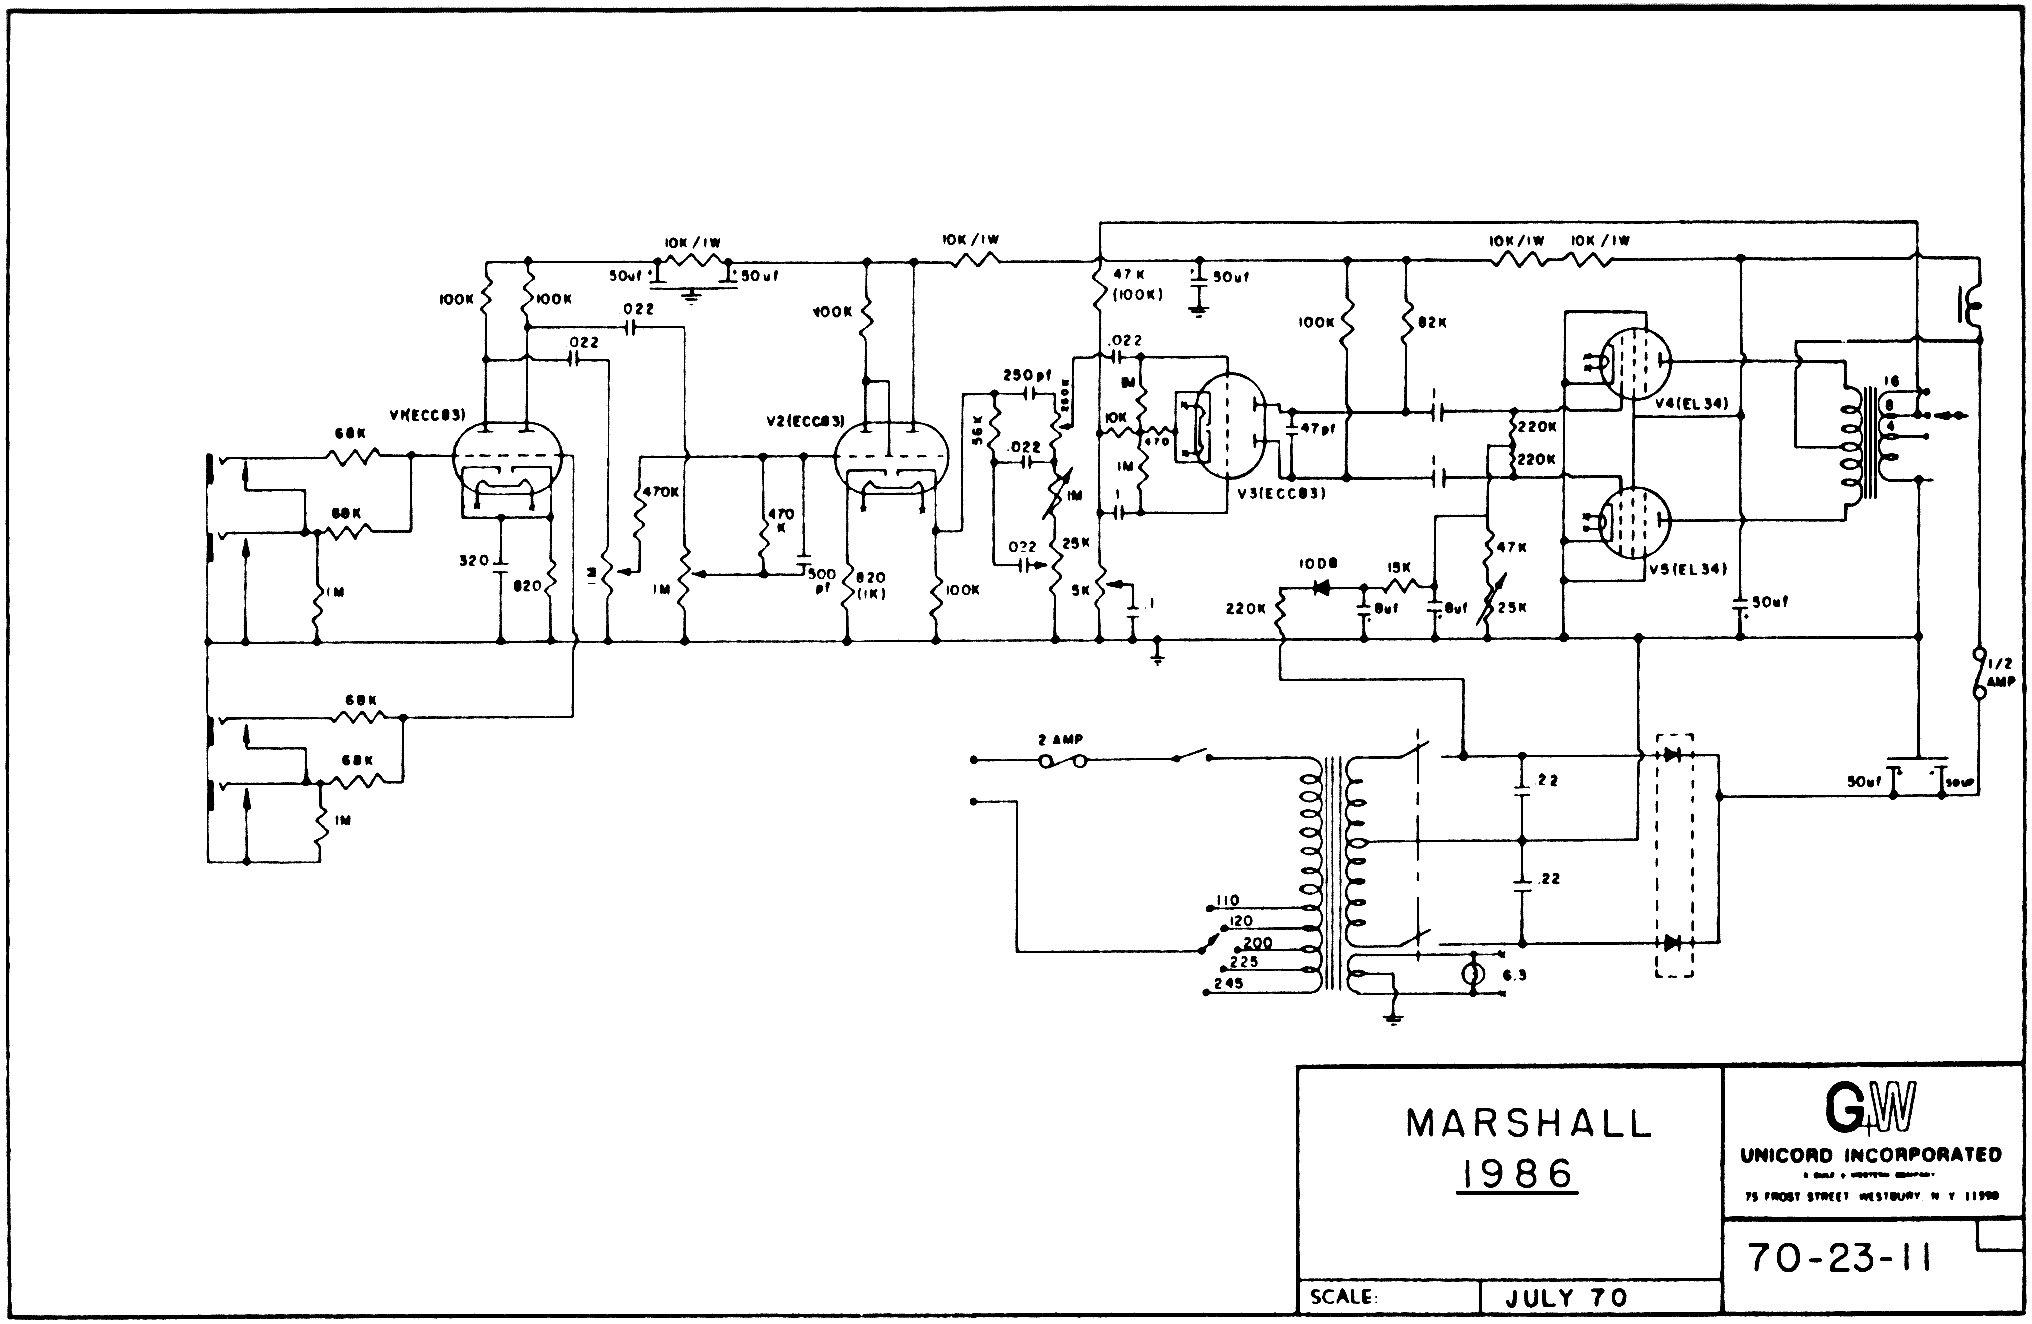
And it's difficult to come up with a HT standby that isn't something of a codge at best, a comically bad source of failure at worst, eg https://drtube.com/schematics/marshall/1986u.gif
A 'least bad' HT standby may be beneficial in the case of silicon rectification and there being direct coupled cathode follower circuits in the amp; though the best way to mitigate the abuses that circuit puts its tube may perhaps be to use proven robust tubes, eg of non-Russian manufacture.
http://www.valvewizard.co.uk/standby.html
http://www.valvewizard.co.uk/dccf.html
https://music-electronics-forum.com/sho ... hp?t=46108
sluckey wrote: Mon Dec 02, 2019 5:41 pm They operate 6 stages in the very successful AB763 reverb models! Not recommending doing so or even saying it's a good idea, just sayin'...
Rather than the 'raw' number of stages on a HT node, I think that the issue is the number of CC gain stages that are arranged in cascade, specifically related somehow to their combined low freq extension/phase shift, total cascaded max gain and number of polarity flips.
So a TR AB763 gets away with 3 cascaded stages on its reverb channel even with old HT decoupling ecaps, probably due to the interstage attenuation; whereas the gain mode of a HRD can oscillate via the HT when the preamp node ecap goes bad (4 cascaded CC stages I think?).
But no reason not to supply the input stages of a 24 channel mixer all from the same node, as they’re intended to be used in parallel rather than cascade.
gingertube
Posts: 530
Joined: Mon Nov 14, 2011 2:29 am
Location: Adelaide, South Oz

Re: Original Circuit schematic and layout... for roasting

Post by gingertube »

Number of Gain Stages on a Power Supply Node. Actually I should say number of stages drawing current from a single power supply node, as a Cathode Follower counts as a stage (it draws current - right!!).
See what I wrote here:
https://ampgarage.com/forum/viewtopic.php?f=6&t=32818
Cheers,
Ian
Post Reply